How to Create a Website for Free on Google that connects with people, inspires them, and generates leads? At the end of this article, you’ll be able, to create a website responsive and attractive and that won’t put you in debt. Here’s how we’ll proceed:
Basically, there are four main steps to creating a website:
To begin, register a domain name. mind Your domain name should be relevant to your products or services so that buyers can quickly locate you on the internet. following that After that, choose a web hosting firm, prepare your content, and build your website.
Table of Content:
What are the 7 Features of a Great Website
What is a Website
Create a Website Free and Paid
Create a Website for your Business
Create a Website with Google
How to Create a Website from Scratch?
Create a Website with WordPress
Create a website shortcut on Desktop
Best Free Website Builders
What are the 7 Features of a Great Website:
Thousands of pre-made templates and themes make it easy to build a website – if you want to go beyond a simple, shelf website that looks professional to give the business a basic start – what you really need to create a great website.
1. Functional and well-designed
2. It’s Simple to Use
3. It’s mobile-friendly
4. Fresh, standard materials.
5. Easily accessible contact and location.
6. Clear calls to action
7. Optimized for search and social web.
Audience diversity and customer retention require active websites that express themselves in a customized or personalized way: we call these sites user-friendly. New technologies are needed to make the content personal and customizable. Information filtering can be used to discover important content and is, therefore, a key technology for creating user-friendly websites.
A literature survey indicates that there are major types of decision-makers: page loading speed, business content, navigation performance, security, and marketing/customer focus. The relative importance of each category was determined by Measuring the number of references in the literature and surveying end-users.
What is a Website:
A website is a collection of web pages and related content that is published on at least one web server and is identified by a unique domain name. The World Wide Web contains all publicly accessible websites. Websites are an important tool for businesses to establish their legitimacy and establish customer trust.
Good examples are – “Nicheblink.com, Google.com, and Amazon.com.”
Create a Website Free and Paid:
You don’t need any technical knowledge to use a good CMS, and it will help you keep your site up to date. You should choose a CMS that is adapted to your needs; different systems are used for different reasons, such as user-friendliness, extensibility, and cost.
The following are some well-known systems, along with evaluations of their advantages and disadvantages.
1. WordPress is the most widely used content management system (CMS) in the world. It is similarly free and straightforward to set up. Finding someone or an agency to work on your site shouldn’t be difficult because most website developers are familiar with it.
However, it should be noted that WordPress’s primary shortcoming is security—hackers target it the most due to its popularity. Your WordPress site must be updated and secured on a regular basis to avoid being hacked.
2. Drupal is a well-known content management system. It has many of the same advantages as WordPress, including flexibility, ease of use, and a large community of users. It’s worth noting that it’s a more secure CMS than WordPress. However, it does not have many plugins or theme options, which makes it less scalable.
3. Joomla! is a popular content management system. It offers greater SEO, security, and multilingual capabilities out of the box than WordPress; However, with the help of a few plugins, WordPress went beyond the capabilities of Joomla!
4. Squarespace: Squarespace is a monthly or annual subscription service that enables website and blog construction a simple “drag and drops” experience. It is specially designed for creatives and includes high-quality design templates. If you’re on a tight budget and need a basic but attractive website but can’t afford to employ a web designer, this is a great option.
5. Wix: Wix is similar to Squarespace but has a more user-friendly interface. It provides similar features but charges a monthly price instead of an annual fee. Wix has much more templates than Squarespace, but once you choose one, you must stick with it or your site will have to be completely rebuilt.
Free websites are almost always a bad idea, Why?
- 1. Extremely slow websites
- 2. Unprofessional web address
- 3. Trial Service is Not Really Free
- 4. Hidden charges for free website
- 5. They can lock down your data
- 6. Irrelevant advertisements on your website
- 7. They can shut down your website
- 8. You will lose your site address
- 9. They can sell your information
- 10. No site-building tools
How to Create a Website for Free on Google for your Business:
Here are 10 critical steps to get started and enable your small business website to compete effectively in the online marketplace if you want to develop a new startup website or make your existing site more efficient.
- 1. Get a good domain name first.
- 2. Invest in a safe, scalable website hosting plan with excellent technical assistance.
- 3. Display a clear description of your company prominently.
- 4. Make use of the most up-to-date content management system available.
- 5. Select an appropriate e-commerce platform
- 6. Create a user interface for your website that is fascinating, unique, and engaging.
- 7. Make your small company website search engine friendly.
- 8. Consistently create and publish high-quality material.
- 9. Download and install webmaster tools
- 10. Create a website upkeep strategy.
Your small business will have a high chance of success in the online marketplace if you follow the steps outlined.
Create a Website with Google:
How to Create a Website for Free on Google: You can create as many Google Sites as you like for free with only a standard Google account. Google Sites now uses your Google Drive account to store images and anything you post on your site, allowing you to store up to 15GB of assets for free, which you can share with your other Google apps.
Does Google create a website?
Building web pages is simple with the new Google Sites. Simply drag content to the desired location. When you create a new site, it is automatically added to Drive, just like all of your other files. Websites built using Google Sites are responsive, which means they work well on tablets and smartphones.
With Google Sites, you may make a personal or commercial website.
- Open a new Google Sites on your computer.
- Choose a template from the drop-down menu under “Start a new site” at the top.
- Enter the name of your site in the top left corner and press Enter, then add content to your site, and lastly, publish it. Lastly, in the upper right corner, click Publish.
Make a duplicate copy of your website:
- Open the site you wish to duplicate in new Google Sites on a computer, then select More and then Duplicate site in the upper right.
- Enter a name for your cloned site under “Filename.”
- Optional: To modify the site’s location, click Change and then OK.
Tip: It’s likely that your site won’t copy if it’s too big.
- Is Google Give you to Create a Website Free?
- It’s also completely free. With just an ordinary Google account, you can establish as many Google Sites as you like for free. The one catch is that by default, your site will be hosted on Google’s domain, with a URL similar to sites.nicheblink.com/view/yoursite.
- On personal accounts, all features and functions are free (with the exception of 24/7 customer assistance). In addition, your Google Site will come with limitless storage and the opportunity to create up to five custom URLs.
How to Create a Website from Scratch?
- Do your homework
- Do visual research.
- Create your best content.
- Describe a detailed site map.
- Choose a domain name for your website.
- Design your website layout.
- Create a fitting color palette.
- Choose the correct font.
- Add finishing design touches.
- Prioritize your content.
- Embrace social media.
- Improve for SEO.
- Make sure you are mobile-friendly.
- Ask for another opinion.
How to Create a Website Free with Website Builder using Wix Tool:
Create a website today by following these six simple steps.
1. Create a free website with a free website builder. Make a decision about the type of website you want to build.
2. Customize a template or hire someone to create a website for you. Select a starting point.
3. Hundreds of design elements can be dragged and dropped. Text, galleries, videos, vector art, and more can be added.
4. Prepare to do business. Create an online store, a reservation system, a members’ area, and a blog.
5. Go live with your website when it has been published. Begin to establish a professional web presence.
6. Boost the number of people that visit your website. Utilize cutting-edge SEO tools and integrated marketing strategies.
Create a Website with WordPress:
To Create a Website for Free on WordPress, How much does it cost?
Here are the items that should be included in a cost breakdown for a WordPress website:
- Purchasing a domain can cost as little as $15 per year.
- Hosting can be purchased for as little as $8 per year.
- The theme for WordPress. You can begin with a dollar. Annual WordPress theme plans start at $70 if you don’t want to settle for a basic website.
- Plugins for WordPress. Many of them are free, but you’ll need to subscribe to a paid plan if you want advanced features.
Step-by-step instructions on how to create a website for Free with WordPress:
Step 1: Select WordPress as the platform for your website:
Step 1 is all about familiarizing yourself with the tool you’ll use to develop your site in the following steps.
When creating a new website, you can choose from a variety of website platforms known as Content Management Systems (CMS).
The following are some of the most crucial WordPress facts:
- It’s free and open source.
-
It’s the ultimate do-it-yourself website builder.
- it’s fast, optimized, and secure; it’s SEO-ready – which makes promotion easier;
- It’s extremely adaptable, allowing it to run any form of website
- it’s fast, optimized, and secure;
- it’s SEO-ready – makes promotion easier; it’s SEO-ready – makes promotion easier;
- Make a list of keywords that are related to your business or product.
- Check the meaning of the domain name you’ve just discovered.
- Look on Facebook or LinkedIn for the domain name to see if there is a business profile with that name.
- Look to see whether a website domain is available for purchase. “.com” is the finest top-level domain for many websites (TLD).
- Purchase a domain name. You can use a domain registrar to do this.
Step 3: Find a site hosting service:
Before we go any further to create a website, let me clear something up. WordPress comes in two flavors: wordpress.com and wordpress.org. The difference is that you can host and construct a website on WordPress.com. WordPress.org is often where you get themes and plugins for your self-hosted website.
The next step is to locate a dependable web host for your website. Shared hosting, virtual private servers (VPS), and managed to host are the three types of hosting services available.
What’s the difference between a shared server and one that’s dedicated? In the vast majority of circumstances, shared web hosting would be enough, and it is highly popular among WordPress users.
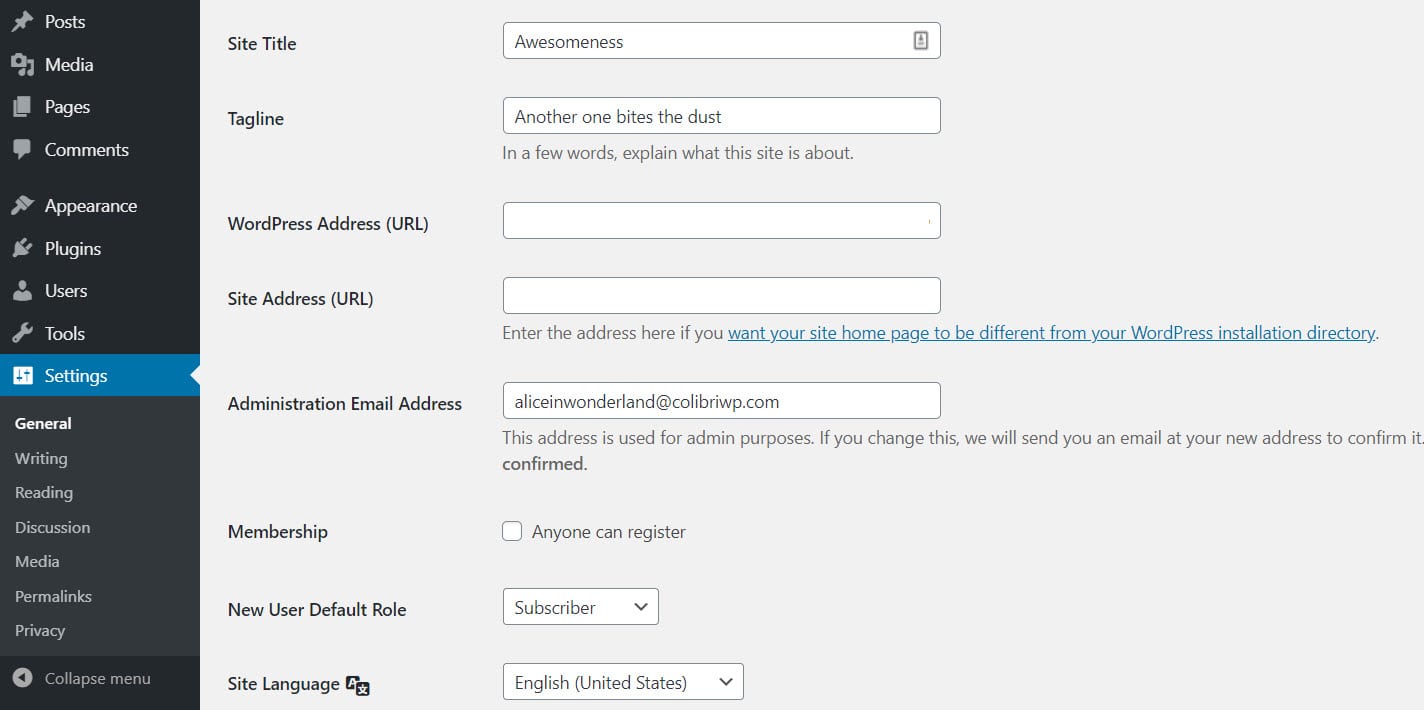
The site title, logo, URL, time zone, time & date format, and language can all be customized under “General.”
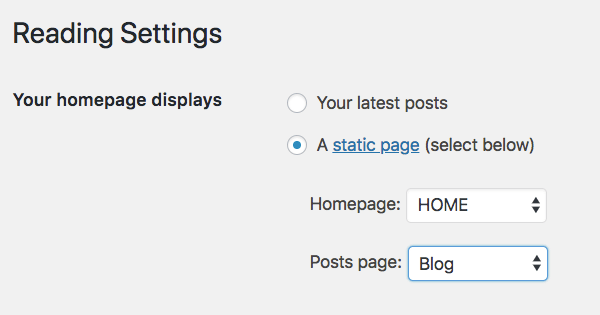
You’ll tell WordPress which page acts as the homepage and which one is your “blog” under “Reading.”
When adding a picture to the Media Library, you can set the maximum dimensions in pixels to use under the “Media” section.
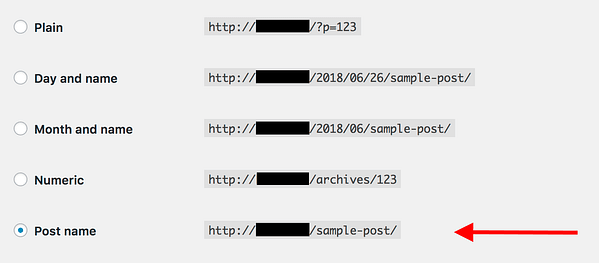
You’ll set up the format of your URLs under “Permalinks.”
Within “Privacy,” you can define your privacy policy pages.
To make sure you don’t forget anything vital, enter all of these items and fill in the blank information in the “Settings” panel.
It’s a good idea to take care of some basic getting-started WordPress settings at this point since they’ll help you have a better experience down the line.
Create a Website:
a) Create a set of permalinks
Permalinks define how each web page is addressed. Go to Settings Permalinks in your WP dashboard’s main sidebar to set your permalinks.


e) Decide on your time zone.
In general, you should adjust the time zone to either your current location or the location of your target audience. Whichever option makes the most sense.
In Settings, General, you can change the time zone.
Step 5: How to Pick a WordPress theme and Install:
It’s time to set up WordPress and get started. The following step is to select a WordPress design theme. There are thousands upon thousands of themes to choose from, with prices ranging from free to hundreds of dollars. When choosing a theme, make sure it makes sense for your site’s theme as well as the layout and material you intend to post.
Create a Website:
Step 6: Get plugins to expand the capabilities of your website.
A WordPress Plugin is a program developed in the PHP scripting language that enhances a WordPress website with a specific set of features or services.WordPress plugins give your WordPress site a lot of customization and flexibility, as well as useful features and tools for your visitors.
Here are the plugins you should look into – and the greatest part is that they’re all free:
- Yoast SEO – helps you in making search engine optimization updates and making your site more search engine friendly in general.
- Google Analytics for WordPress – this plugin connects your website to the most popular online traffic analysis tool.
- Wordfence Security – This makes your WordPress site more secure.
- UpdraftPlus – backs up your website automatically.
- Optimole is a program that optimizes your photographs.
- WPForms — allows you to add interactive contact forms to your website, allowing your visitors to contact you directly – much better than presenting your email address in plain text.
Step 7: Complete your administrative pages:
Your contact page, about page, privacy page, and disclaimer page are all important pages. Before you start adding content to your website, get these things out of the way.
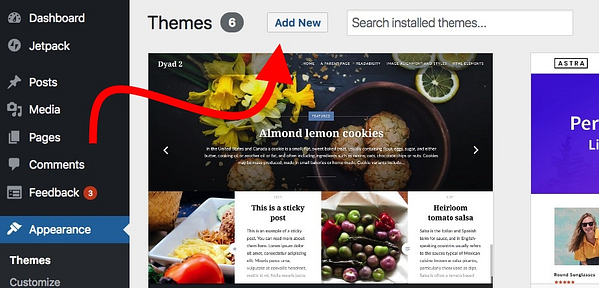
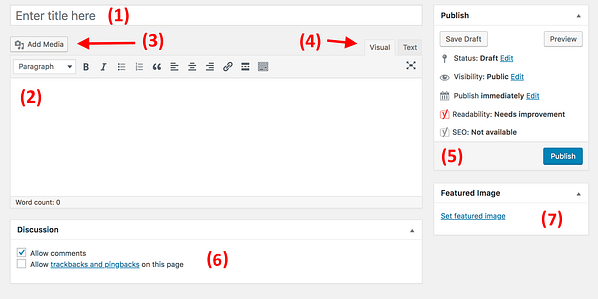
To do so, go to your WordPress dashboard and select Pages Add New from the drop-down menu. This is the screen you’ll see:
Step 8: Think about beginning a blog:
Creating and maintaining a blog is a simple notion. You post articles on a regular basis that are linked to the topic of your website.
One of your pages should be designated as the main blog listing for the entries to make them easily accessible.
- To begin, go to Pages Add New and make a new blank page. Just to be clear, we’ll call it a “BLOG.”
- Then, in Reading Settings, pick your newly created Blog page as the “Posts page,” as shown below:
Here, we’ll concentrate on two points:
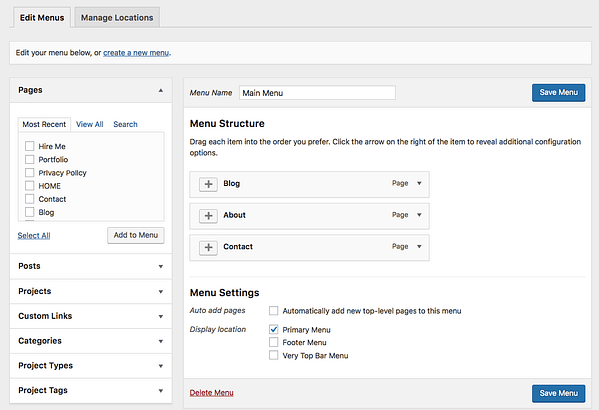
a) Menus: Depending on your theme, you’ll have a few options for menu settings to pick from. The best part about this entire panel is that you can reorder the menu items by dragging and dropping them.
When you’re finished, go to the bottom of the page and select the menu location. Choosing the “Primary Menu” placement usually results in the menu being displayed in the top portion of the website.
Create a website shortcut on Desktop:
To create a desktop shortcut in Google Chrome, go to a website and click the three-dot icon in the top-right corner of your browser window. Then select More tools > Create shortcut from the drop-down menu. Last, assign a name to your shortcut and click the Create button.
In Windows, how can I put a webpage on my desktop?
To begin, navigate to the website you want to include in your Start menu. Drag and drop the icon to the left of the website’s address in the location bar to your desktop. You’ll get a shortcut to that website on your desktop.
What Is the Process for Making a Shortcut for My Application?
Select New->Shortcut from the right-click menu in the folder where you want to create the shortcut.
You will be asked to type the item’s location.
After that, you’ll be asked to give your shortcut a name.
To close the dialogue, click Finish.
Best Free Website Builders:
Create a Website: There are five of the top free website builders on the market, so you can compare them side by side and figure out which one is the greatest fit for your needs by the end.
- Wix is the best all-around website builder available. A prominent banner ad appears across the top of free Wix sites with 500MB of storage and a monthly fee of $14. (billed annually)
- Weebly is one of the most user-friendly free website builders available, with a superb small business plan. Price: $6 per month for 500MB (with a 10MB upload restriction) (billed annually)
- SITE123 is a user-friendly website builder that focuses on getting you online quickly. A very inconspicuous banner displays along the bottom of the page once the user scrolls a bit farther down the page, offering 500MB of storage for $12.80 per month (billed annually)
- Strikingly: A simple, attractive, one-page website builder that is free to use. Small scroll-triggered slide up an ad in the lower-left corner with 500 MB storage and a monthly price of $8 (billed annually)
- WordPress.com: Designed specifically for blogging, this free platform combines sophisticated capabilities with a simple website builder design to give you all you need for your blog. A little white banner runs across the top of the page, with a WordPress button in the top right corner offering 3 GB of storage and a monthly fee of $4. (billed annually)
Bonus – How do you drive people to your website?
IF your traffic is increasing but your conversion rates are decreasing, you’re not getting in the right traffic
The traffic to your website is both an indicator and a driver of business growth. It can help you in analyzing how well your marketing is performing, collect data, optimize your SEO, and produce more leads in order to increase your customer base.
Conversion optimization can be done in a variety of ways.
- By including calls to action and lead capture forms in the right places.
- Providing the data that your visitors are looking for.
- Creating a simple and intuitive navigation system.
When it comes to website traffic, your aim is to persuade more quality visitors. Those who are most likely to convert into leads and customers, in other words.
Channels that Drive Quality Traffic to Your Website
Some of them are a mix of channels that operate together to generate traffic. Some need effort, while others need time and money. The following are some of the tactics and channels that help attract visitors to your website:
- Online Directory Listings
- On-Page SEO
- Off-Page SEO
- Social Media
- Online Ads
- Blogging
Free Ways to Increase Website Traffic from Google
- 1. Optimize Your Free Google Business Profile
- 2. Perform On-Page SEO
- 3. Get Listed in Online Directories
- 4. Build Backlinks
- 5. Post to Social Media
- 6. Include Hashtags in Your Posts
- 7. Use Landing Pages
- 8. Target Long-Tail Keywords
- 9. Start Email Marketing
- 10. Guest Blog
- 11. Engage Online
- 12. Learn from Your Analytics
Paid Ways to Drive Website Traffic from Google
- Google Ads
- Google Maps Advertising
- Social Media Advertising
- Display Advertising
Avoid Instant Website Traffic Generators
If you’re thinking about using a paid or free automatic website traffic generator for your business, here are three reasons to avoid it:
- Auto Website Traffic Generators Can Hurt Your Rankings
- Your Traffic Won’t Be Targeted
- Your Site Could Get Banned